Counting Bricks

I always liked to start the year with a counting project to promote number sense and place value skills. For many years my classes counted the number of bricks in the building. This was also intended to help students define, organize, and sequence the steps needed to do it.
This is a picture of Maloney Magnet School at the right. A group of 4th graders counted the bricks on the front of the school a couple of years ago (we didn’t have the time to count the entire building).

At left is a picture of how we organized one section of bricks in the front to be grouped for counting. As you can see, students would outline rectangles of bricks and label identical rectangles. It helps if students have worked with arrays before.
Here is a suggested sequence of steps.
1. Discuss big numbers…how many bricks do you THINK the building has?…dozens?…hundreds?…thousands?…tens of thousands?…millions? We all guessed a little high – the front of Maloney had just under 10,000 bricks.
2. Then discuss precise vs. estimated or approximate numbers. Are we going to count every single brick? Predict how many bricks are in the entire building, or the part you’re going to count.
3. Divide the students into groups of 3 or 4. It is OK to have more than one group counting the bricks on the same section of the building – later, they can compare figures.
4. Take pictures of the building similar to these, and display them to the class to show them how they can divide up their sections.
5. Each group is assigned a section of the building to count, and gets a picture of the building or their assigned section.
6. Within each group, one student is chosen to have the picture on a clipboard. This student will record the counts. Other students decide which rectangles they will be responsible to count. For a given rectangle, one student should count the number of bricks in each row, and another should count the number of rows. All this can be decided before the class goes outside.

7. The class discussed the triangles at the peaks. One student counted all the bricks on one side of his triangle, and then doubled the count. Other students counted the number of bricks in one of the lower middle rows on one side. They decided this was a representative number of bricks that would be in each row – the “average.” They then multiplied that by the number of rows, and doubled that count. The bricks in the border around the circle were simply counted.

8. Once outside, students do the counting and report to the student with the clipboard, who records on the picture the number of bricks in each row, and the number of rows, for each rectangle. There may or may not be enough time, or students, to do any of the calculations outside.
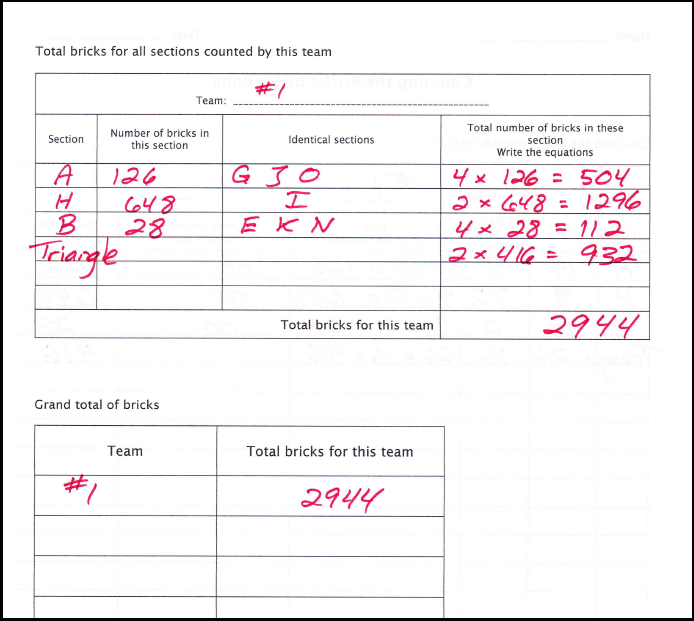
9. Back in the classroom, the number of bricks in each rectangle is calculated. This is good practice – the students did not use calculators.
10. I provide a page with tables on it for students to record the numbers for each rectangle. You may want to have your students make up their own tables, in which case you’ll want to discuss what the requirements for those tables would be. Samples of how the tables are filled out are at the left. You can download these tables below.
Younger students can do variations on this. One fall when the school library had to be boxed up for renovation, my first and second graders stacked the books in tens, and grouped the tens into 10 stacks each to make hundreds. That was a most interesting 3-day project, and an organic way for first graders to count to 1,700.